

This guide shows the 15 steps of the RedMind tutorial “Connect an exchange (OKX)”. Each step has a screenshot, the action and the details. Select a screenshot to zoom.
The RedMind Terminal and most exchange screens are in Portuguese. This guide gives each label as it shows on the screen, with the translation in parentheses.
1

In RedMind, open Contas e acessos (Accounts and access) and choose OKX

In Contas e acessos (Accounts and access), click Conectar exchange (Connect exchange) and choose OKX.
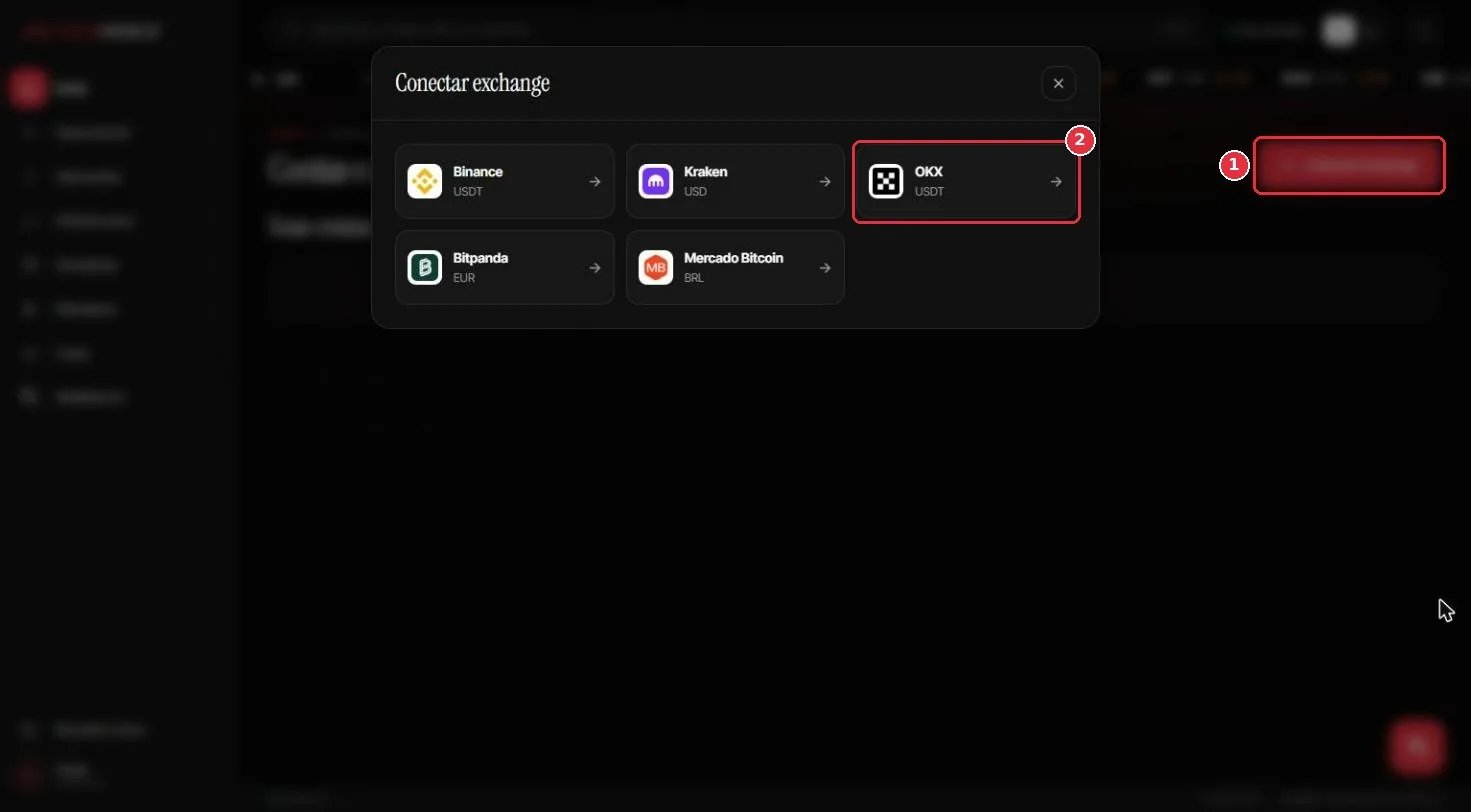
In RedMind, open Contas e acessos (Accounts and access) and choose OKX
Log in to the RedMind Terminal. Click your name in the bottom-left corner and choose Contas e acessos (Accounts and access).Click Conectar exchange (Connect exchange) in the top-right corner. In the Conectar exchange window, choose OKX.Keep this window open: you will come back to it in Step 14.
2

On the OKX website, go to Institucional → APIs (Institutional → APIs)

On the OKX website, hover over Institucional (Institutional) and click APIs.
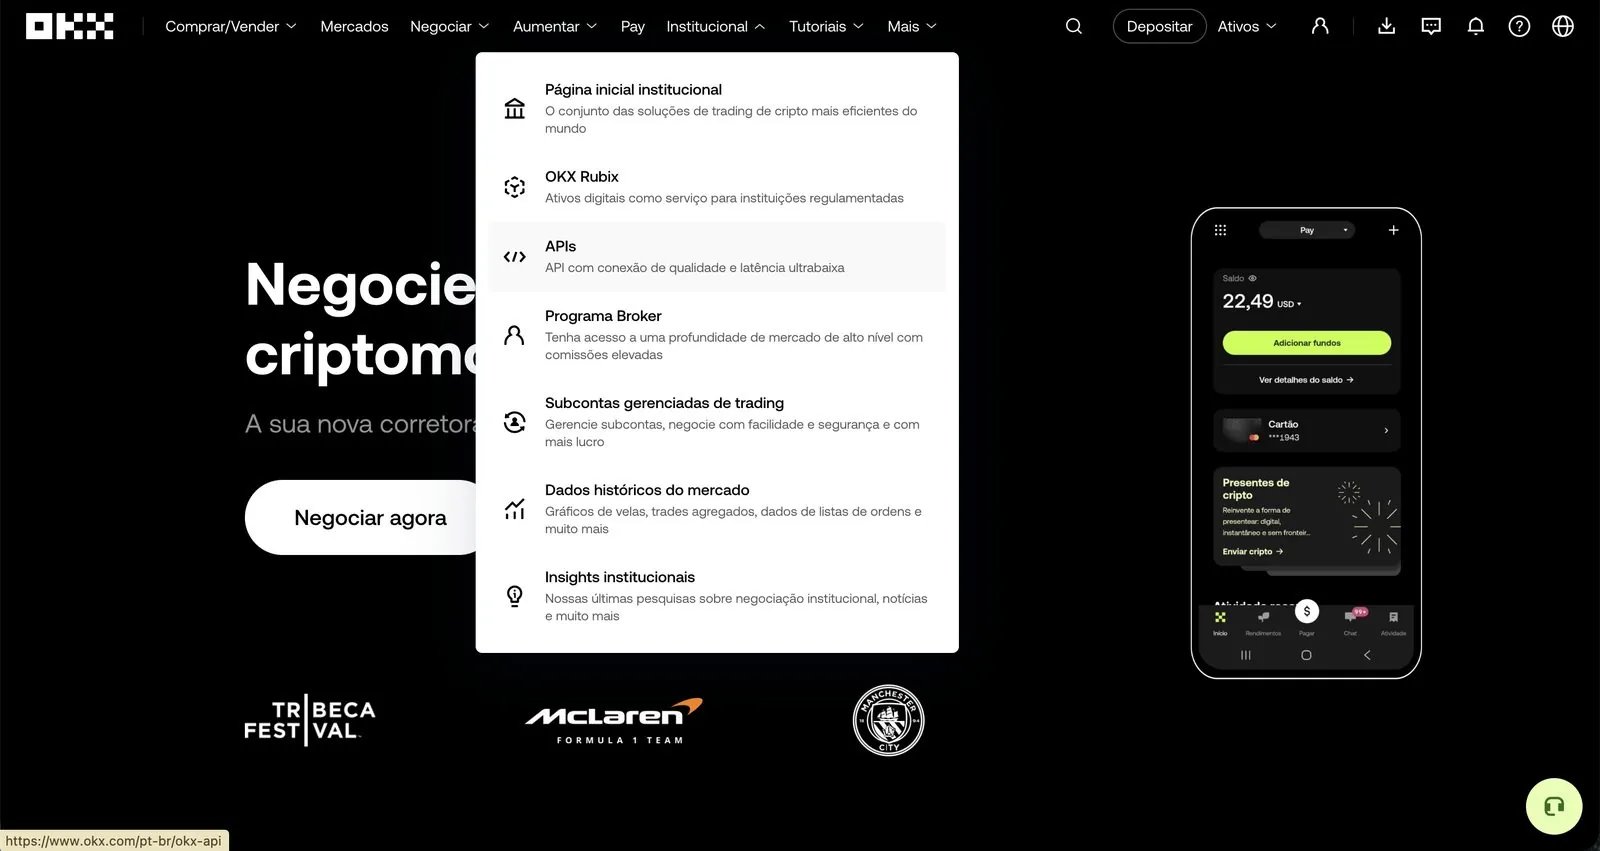
On the OKX website, go to Institucional → APIs (Institutional → APIs)
Open okx.com and log in. In the top menu, hover over Institucional (Institutional) and click APIs.
3

Click Crie sua chave de API (Create your API key)

On the OKX API page, click Crie sua chave de API (Create your API key).
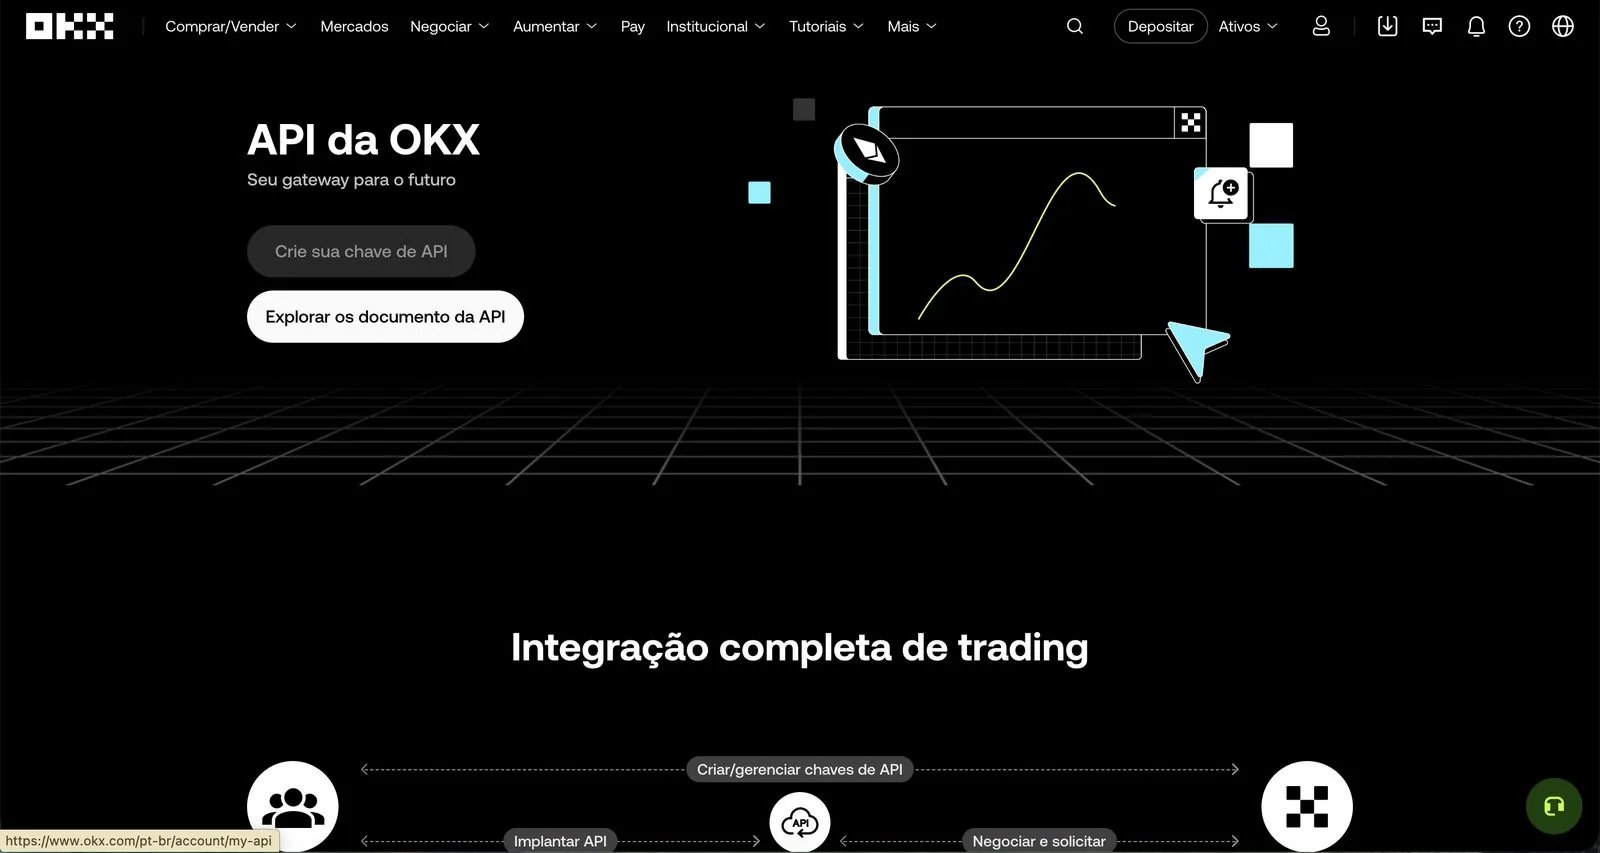
Click Crie sua chave de API (Create your API key)
You land on the API da OKX (OKX API) page. Click the Crie sua chave de API (Create your API key) button.
4

Click Criar chave de API (Create API key)

Click the green + Criar chave de API (Create API key) button.
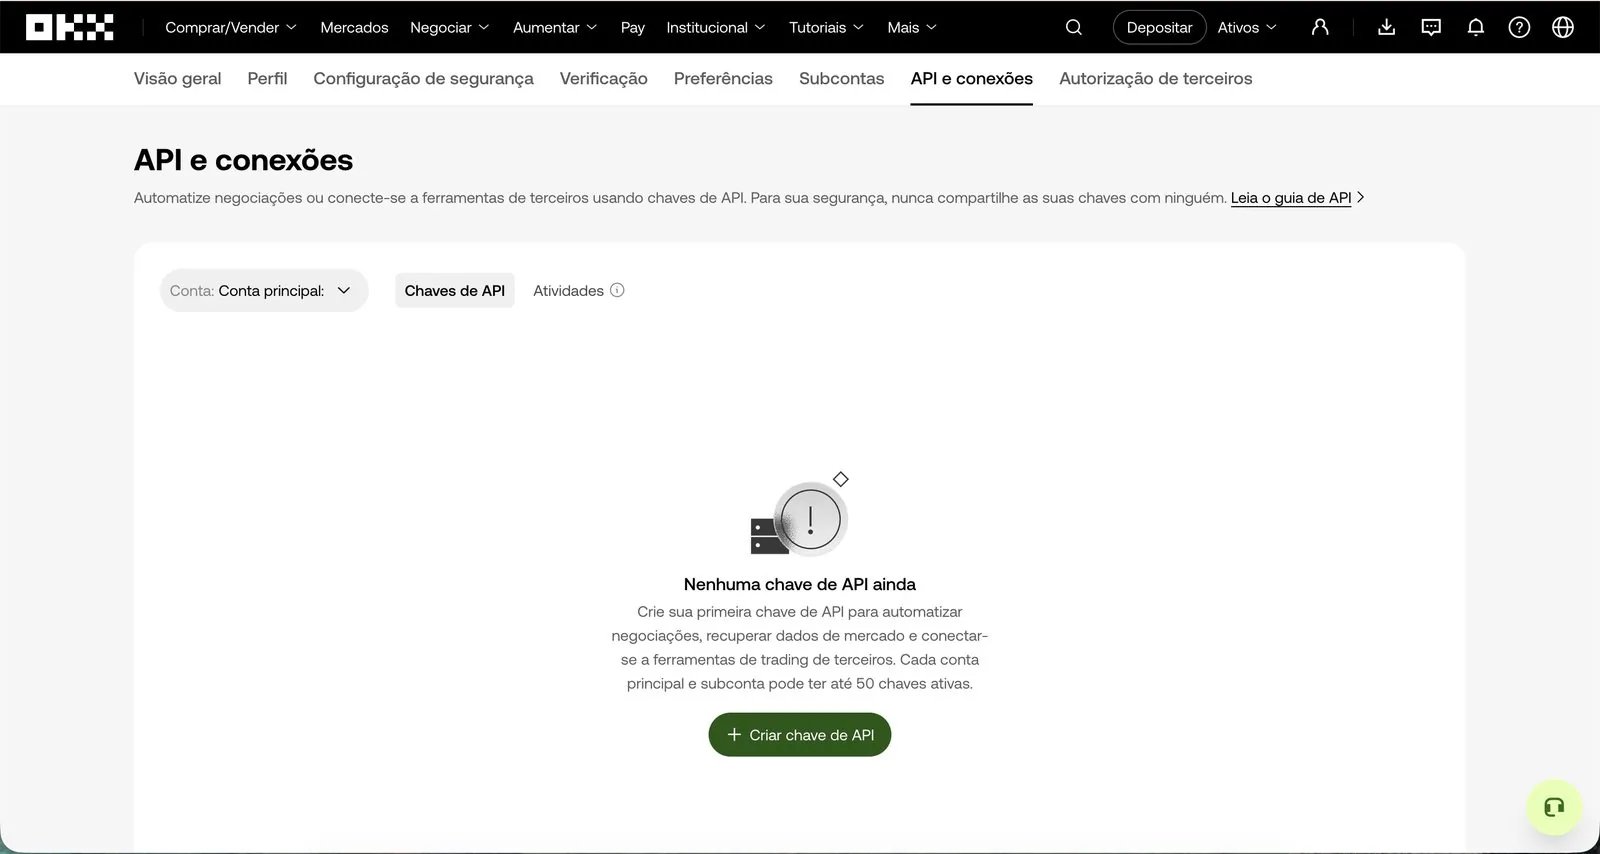
Click Criar chave de API (Create API key)
If you don’t have any keys yet, you see the message Nenhuma chave de API ainda (No API keys yet). Click the green + Criar chave de API (+ Create API key) button.
Limit: The main account and each subaccount can have up to 50 active keys.
5

Name the key and choose Negociação de API (API trading)

Type a name for the key and keep Negociação de API (API trading) selected under Uso (Usage).
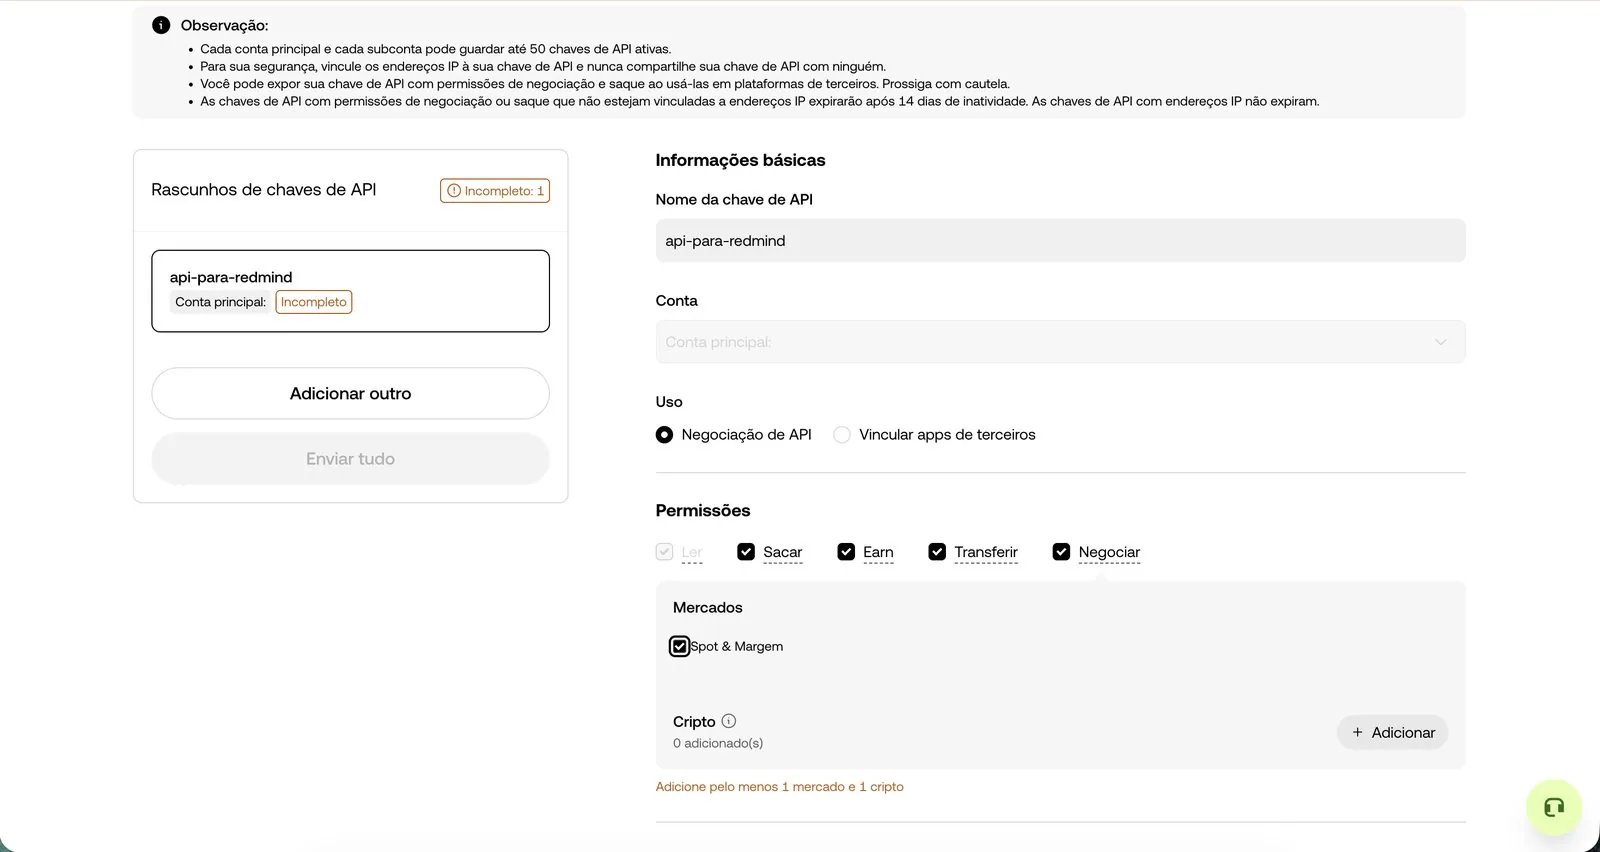
Name the key and choose Negociação de API (API trading)
Enter an easy-to-remember name in Nome da chave de API (API key name). We suggest api-para-redmind.Under Uso (Purpose), leave Negociação de API (API trading) selected. Don’t use “Vincular apps de terceiros” (Link third-party apps).
6

Add all available cryptos

In the Cripto (Crypto) section, click + Adicionar (Add), then Selecionar tudo (Select all).
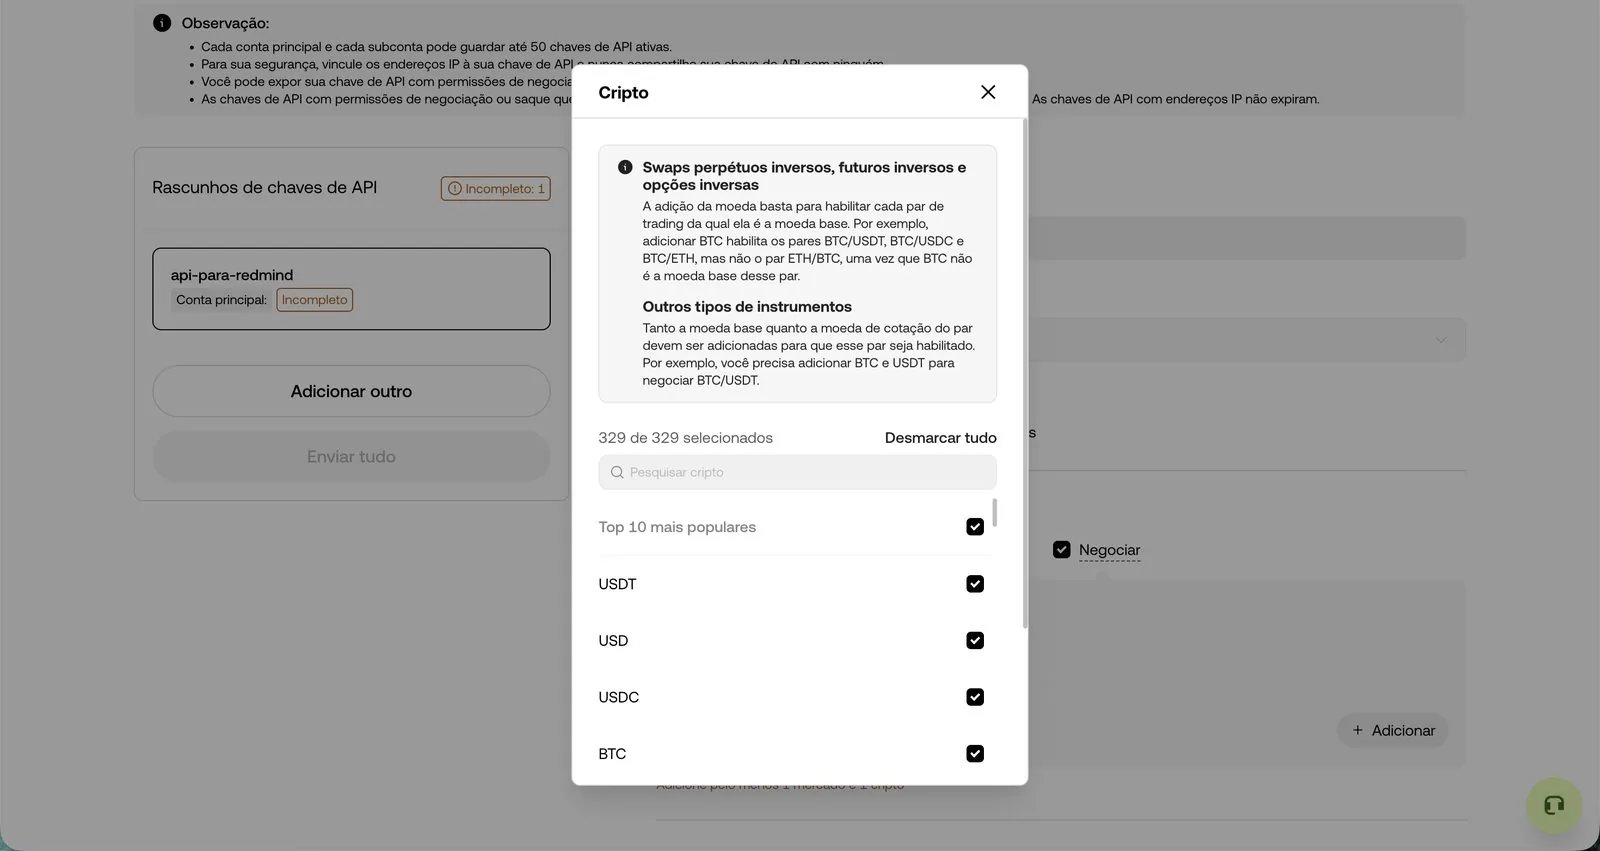
Add all available cryptos
OKX requires you to select at least 1 market and 1 crypto. In the Cripto (Crypto) section, click + Adicionar (+ Add) to open the list.In the dialog that opens, click Selecionar tudo (Select all) in the top-right corner. This unlocks all 329 cryptos available for trading on OKX.This way, the RedMind Autopilot can trade any pair without you having to reconfigure the API later.
7

Confirm the selection

Scroll to the bottom of the window and click the green Confirmar (Confirm) button.
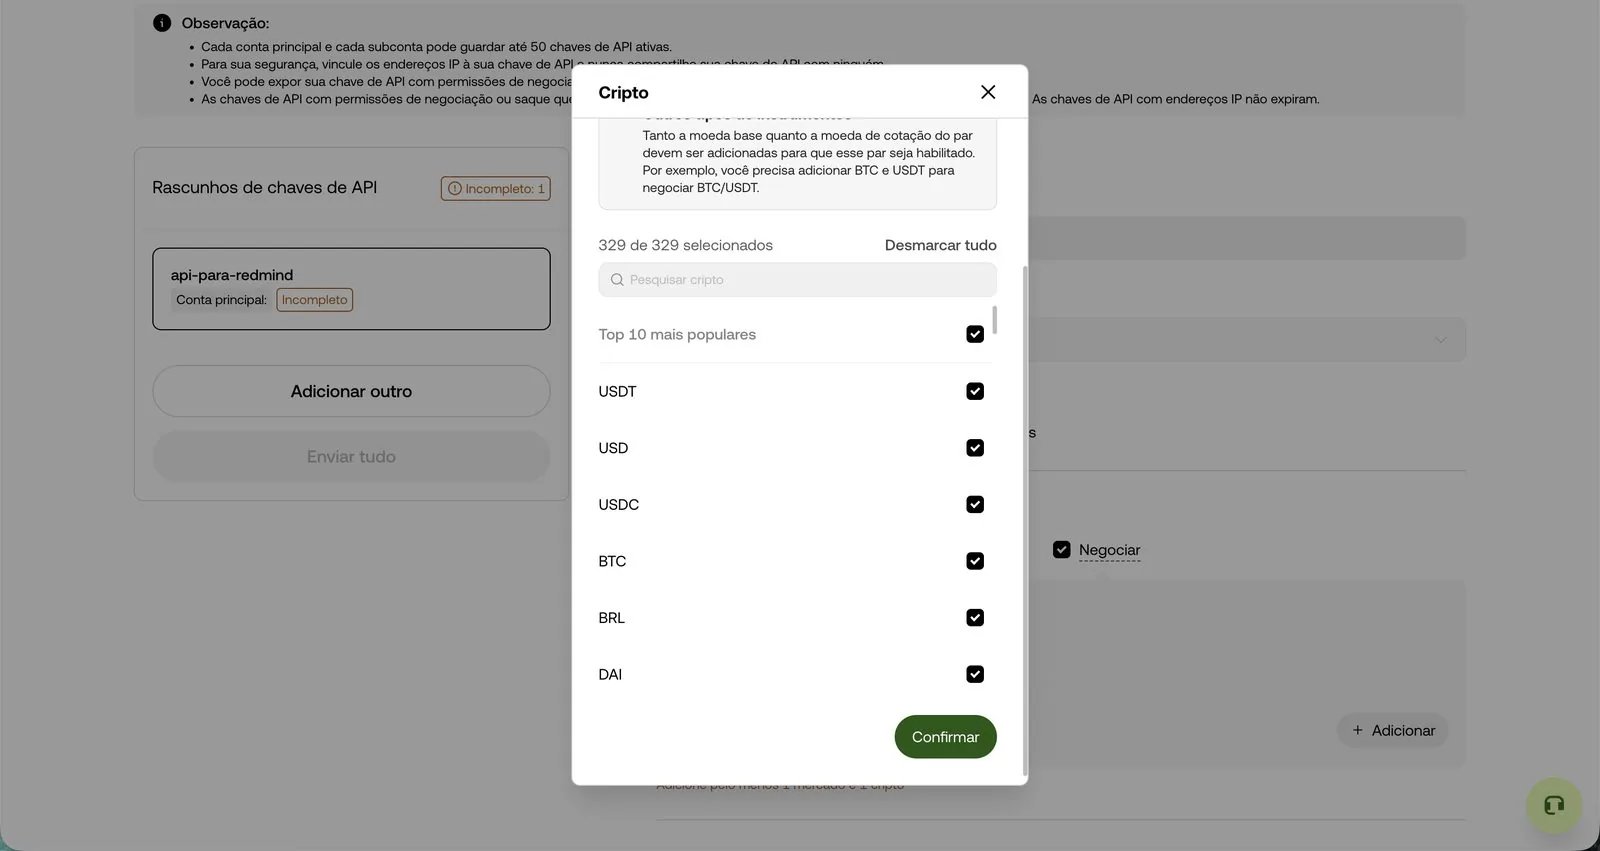
Confirm the selection
Scroll to the bottom of the dialog and click the green Confirmar (Confirm) button.
8

Set a secure passphrase

In the Segurança (Security) section, fill in the Frase secreta (Passphrase) field with 8 to 32 characters and store it safely.
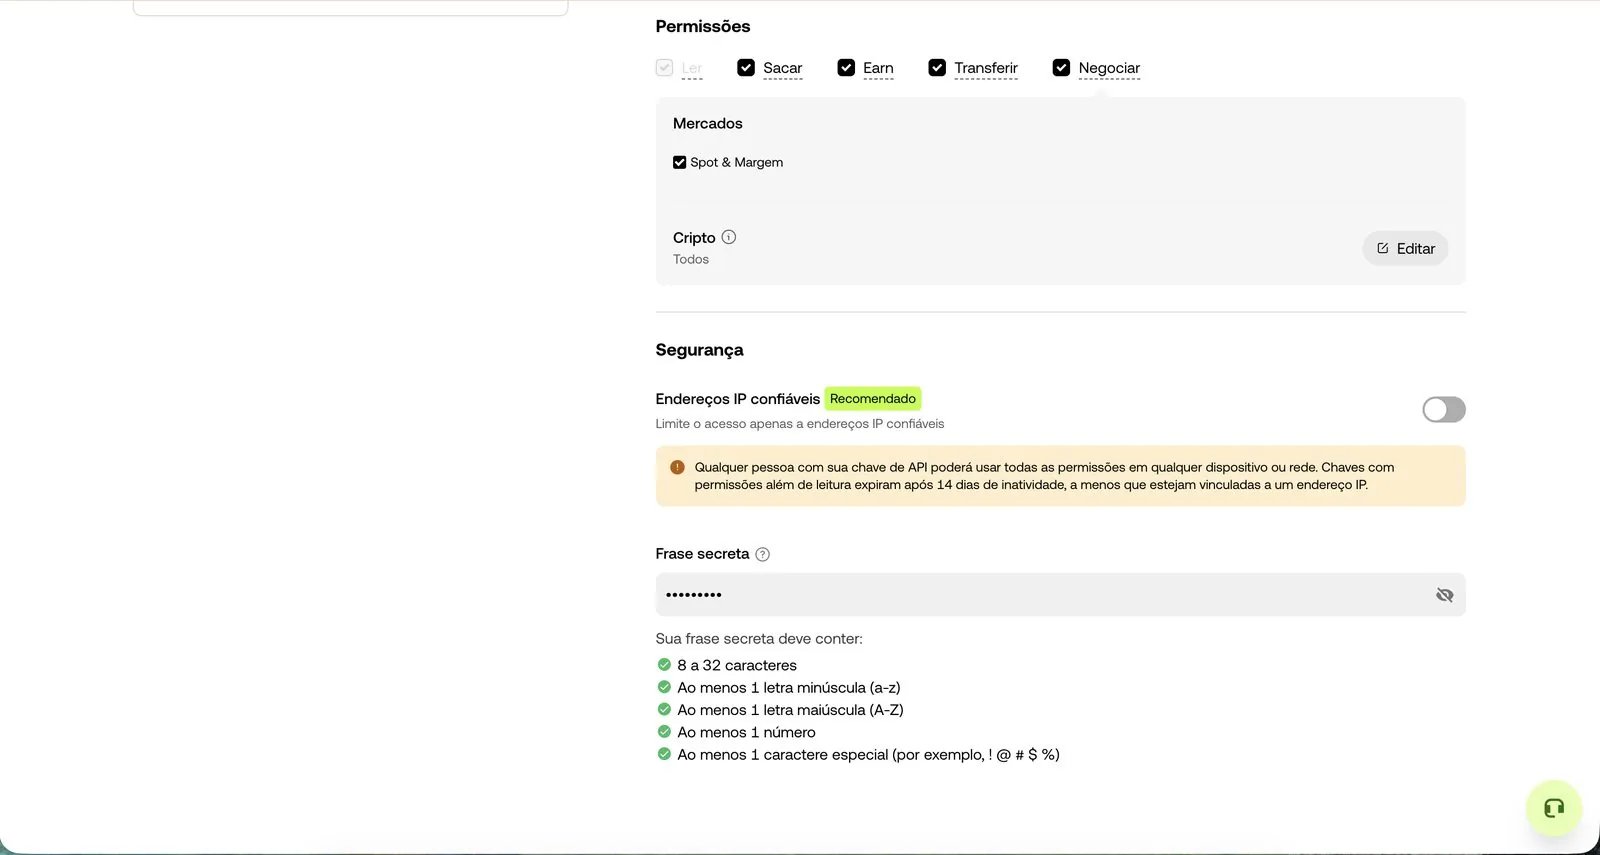
Set a secure passphrase
Scroll to the Segurança (Security) section. Fill in the Frase secreta (Passphrase) field. It must meet these requirements:✓ 8 to 32 characters · ✓ Lowercase letter · ✓ Uppercase letter · ✓ Number · ✓ Special character (! @ # $ %).
Warning: Store this passphrase somewhere safe: you’ll need it to connect to RedMind. It’s different from your OKX account password.
9

UNCHECK the Sacar (Withdraw) permission

Under Permissões (Permissions), keep Ler, Earn and Negociar checked and uncheck Sacar and Transferir. Never grant Sacar (Withdraw).
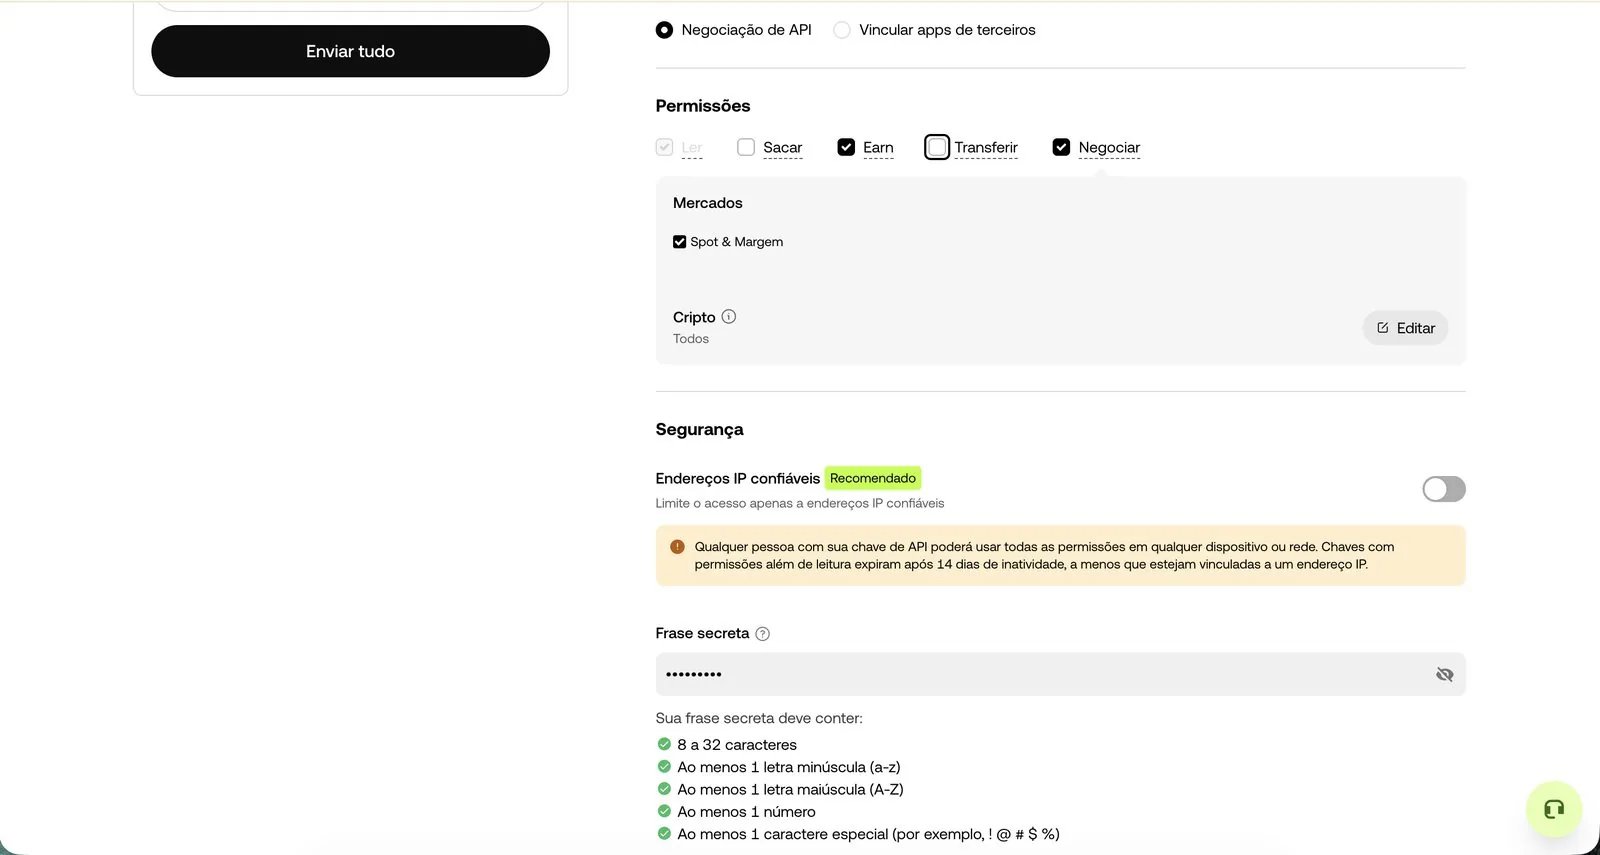
UNCHECK the Sacar (Withdraw) permission
Go back to the Permissões (Permissions) section at the top. You’ll see: Ler (Read), Sacar (Withdraw), Earn, Transferir (Transfer), and Negociar (Trade).To trade with RedMind, keep Ler (Read), Earn, and Negociar (Trade) checked. UNCHECK Sacar (Withdraw) and Transferir (Transfer).
Golden rule: never grant Withdraw permission: RedMind NEVER needs permission to withdraw your funds. If any platform asks for this permission, be suspicious. Keeping Withdraw unchecked guarantees that no one can take your money out of the exchange.
10

Submit the key for creation

Click the black Enviar tudo (Submit all) button.
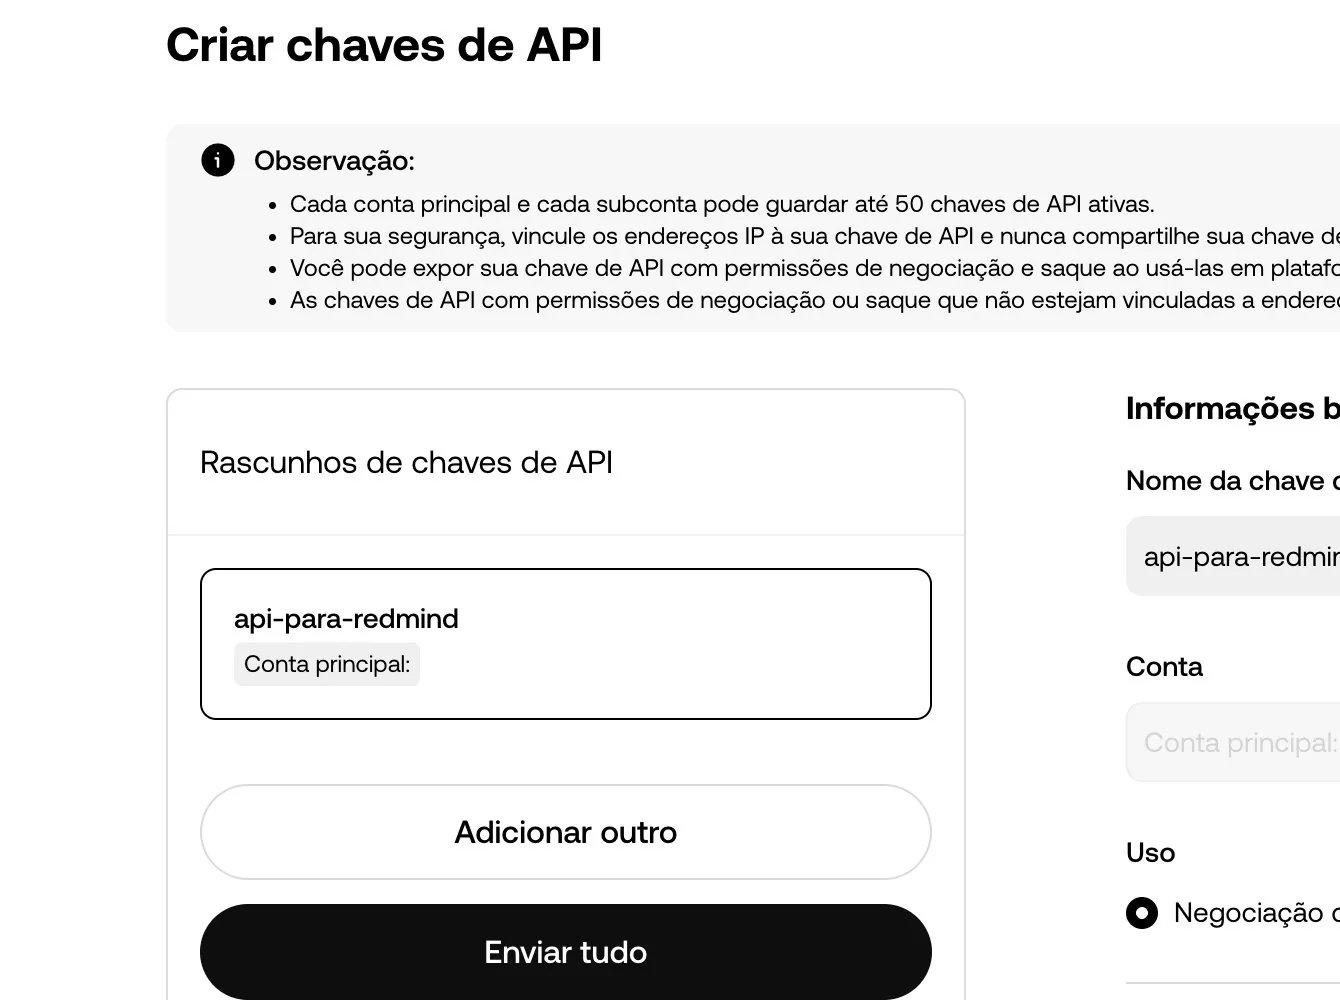
Submit the key for creation
Once the name is filled in, the purpose is set to “Negociação de API” (API trading), the cryptos are added, the permissions are correct (no Withdraw), and the passphrase is saved, the draft shows as valid in the left panel.Click the black Enviar tudo (Submit all) button.
11

Confirm that the key was created

In the Revise sua chave de API (Review your API key) window, click OK.
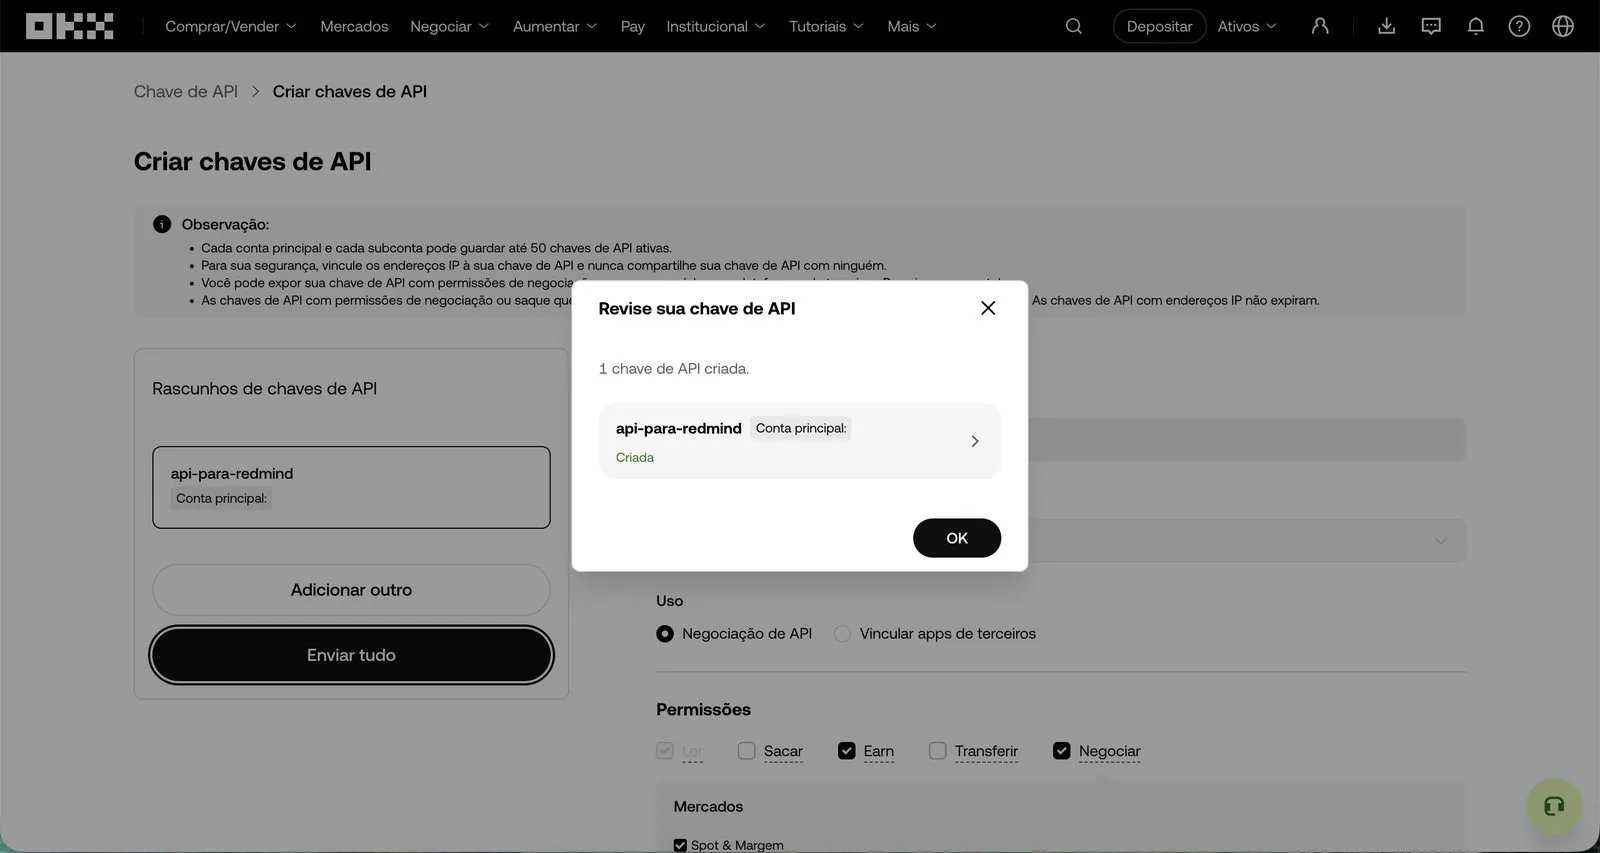
Confirm that the key was created
OKX opens the Revise sua chave de API (Review your API key) dialog, which shows “1 chave de API criada” (1 API key created) with the green Criada (Created) status. Click OK.
12

Open the new key's details

In the Ações (Actions) column, click the magnifier icon Ver detalhes (See details) of your key.
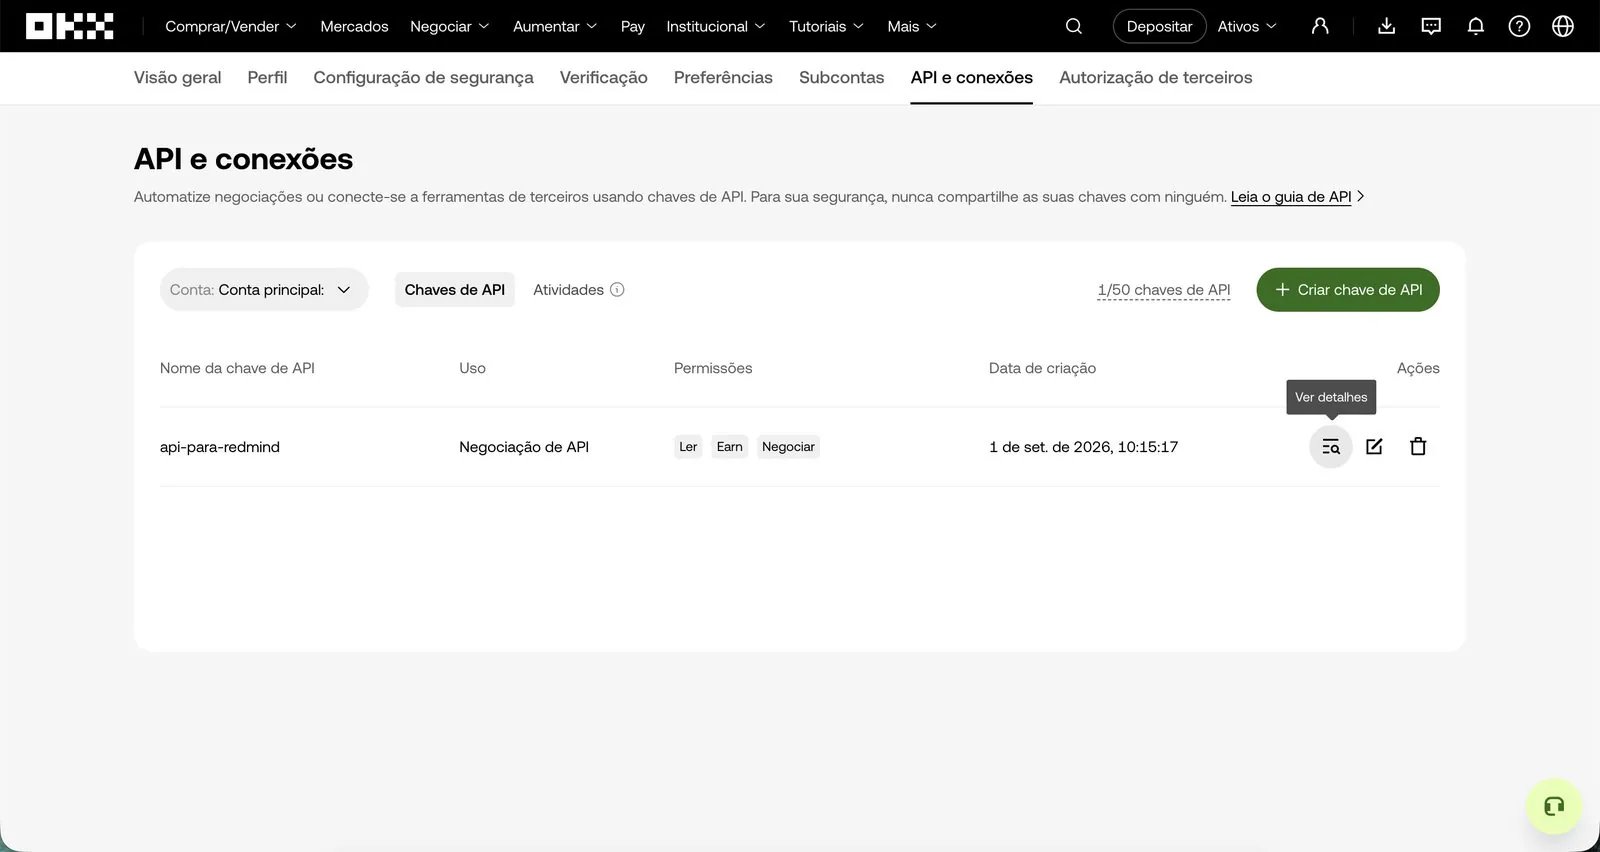
Open the new key's details
Your api-para-redmind key now appears in the API e conexões (API and connections) list with the permissions Ler / Earn / Negociar (Read / Earn / Trade).In the Ações (Actions) column, click the magnifying glass icon (Ver detalhes, View details) to open the credentials.
13

Copy the Chave de API (API key) and the Chave secreta (Secret key)

Click Copiar credenciais (Copy credentials) and save everything: the Chave secreta (Secret key) is shown only once.
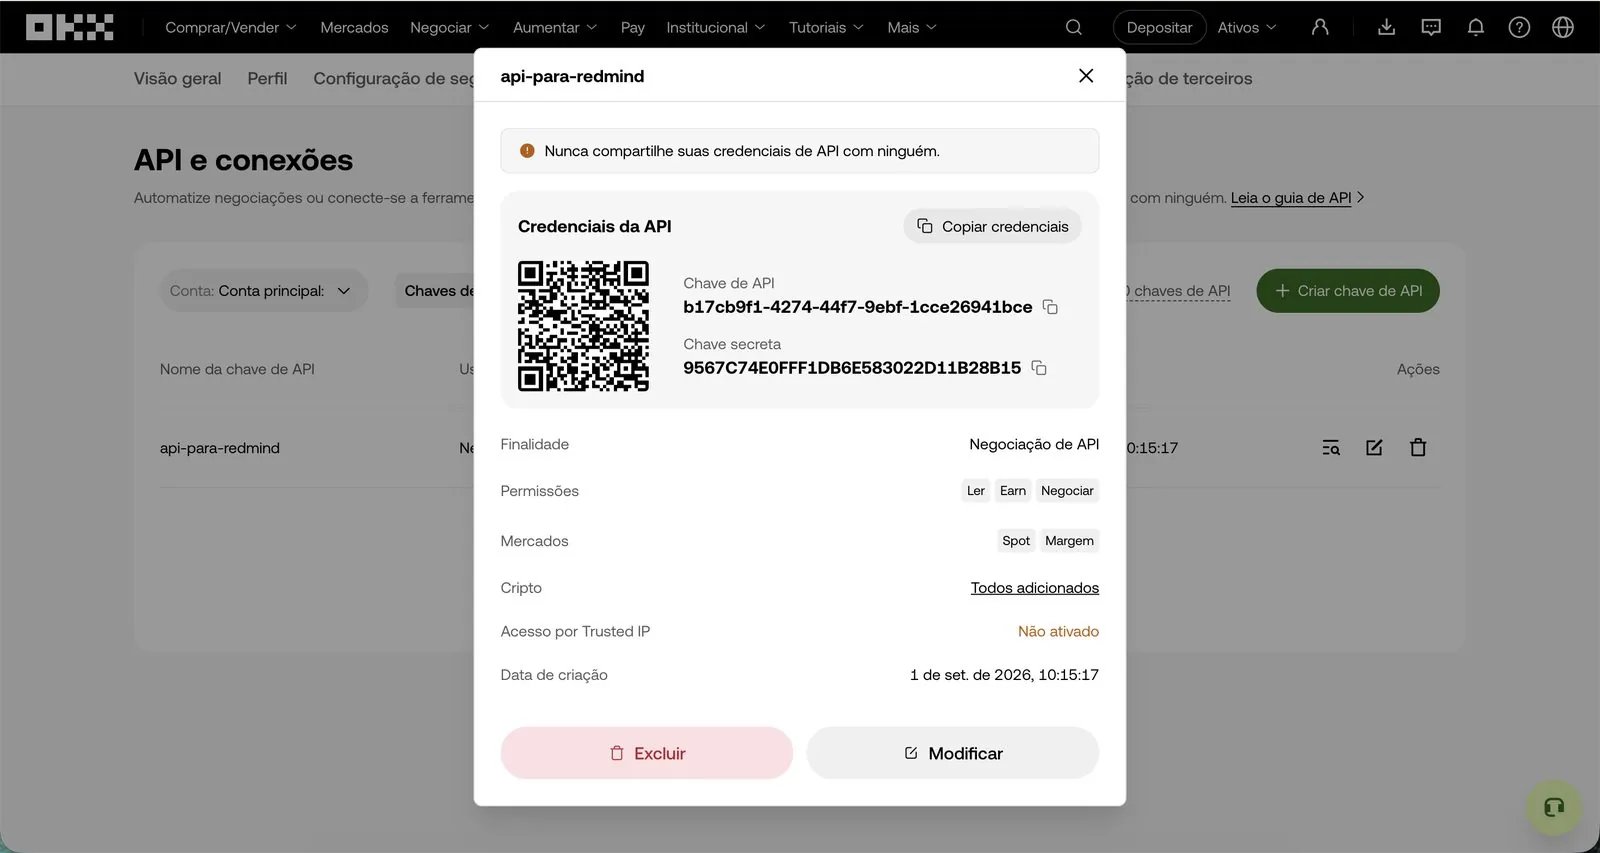
Copy the Chave de API (API key) and the Chave secreta (Secret key)
The dialog shows the Credenciais da API (API credentials). Copy both values:Chave de API (API key), for example b17cb9f1-4274-44f7-9ebf-1cce26941bceChave secreta (Secret key): a long code in uppercase lettersUse the Copiar credenciais (Copy credentials) button or copy each value individually.
Last chance: The full Secret key appears only on this screen. If you close it without copying it, you’ll have to generate a new key. Store the credentials and the passphrase somewhere safe (a password manager).
14

Paste the credentials into RedMind

Paste Chave API (API key), Segredo API (API secret) and Passphrase into the RedMind window and click Conectar e verificar (Connect and verify).
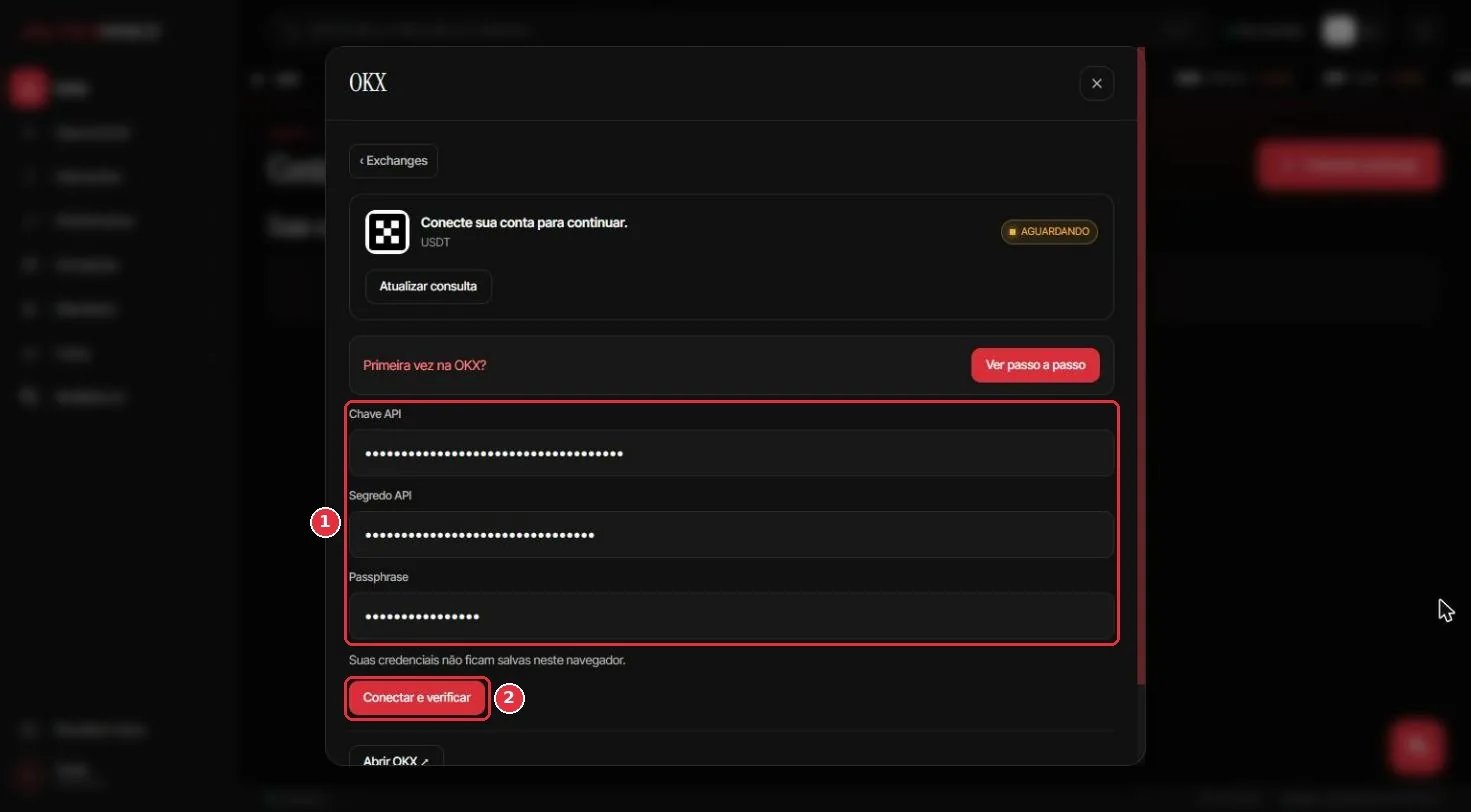
Paste the credentials into RedMind
Go back to RedMind, to the OKX window that you opened in Step 1, and paste the three values:Chave API (API key): the Chave de API (API key) that you copied from OKXSegredo API (API secret): the Chave secreta (Secret key)Passphrase: the passphrase that you created in Step 8Click Conectar e verificar (Connect and verify).The credentials are used only to create the connection. They are not saved in your browser.
15

OKX connected successfully

Check the Conectada (Connected) badge and the USDT balance. Click Sincronizar (Sync) to refresh the balance.
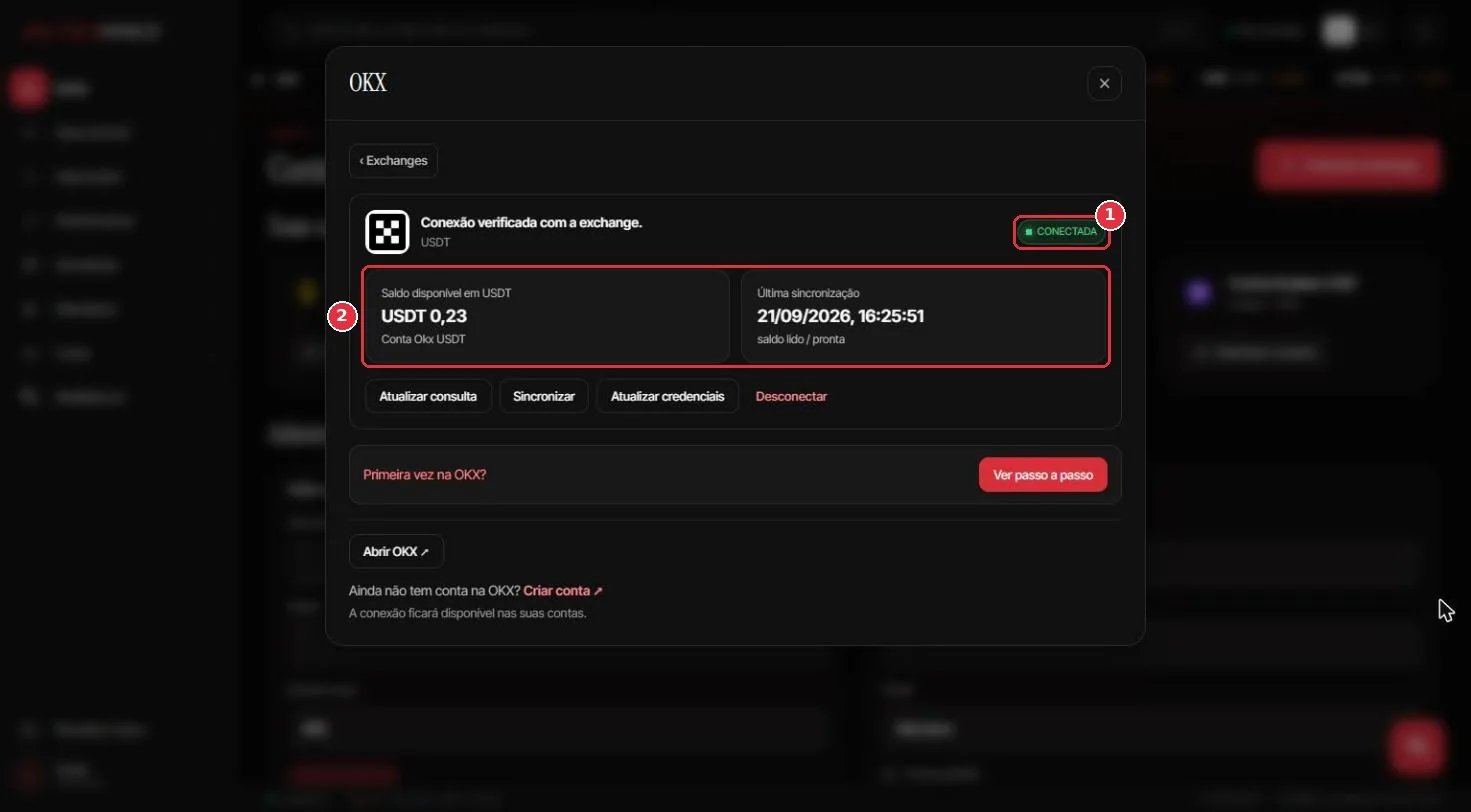
OKX connected successfully
Within seconds, the badge changes from Aguardando (Waiting) to Conectada (Connected), and the message Conexão verificada com a exchange (Exchange connection verified) appears. You see the available USDT balance and the date of the last sync.Use Sincronizar (Sync) to update the balance, Atualizar credenciais (Update credentials) to replace the keys, or Desconectar (Disconnect) to remove the connection. To open this window again, go to Contas e acessos (Accounts and access) and click Gerenciar conexão (Manage connection).Your exchange is now integrated. Next step: create your first portfolio.
Other exchanges: The process for Binance, Kraken, Bitpanda, and Mercado Bitcoin is similar. Click Conectar exchange (Connect exchange), choose the exchange, and paste the keys. Only the fields change: only OKX asks for a Passphrase, and the others ask only for the Chave API (API key) and the Segredo API (API secret). Always uncheck the Sacar (Withdraw) permission.

Next steps

Create your first portfolio

Describe the portfolio that you want and let RedMind AI build it.

Common questions

Find short answers about accounts, exchanges and portfolios.